WebエンジニアのBunです。主にiOSアプリの開発を担当しています。
日々いろんな解錠方法について考えています。特にiOSアプリで使えるいろんな便利な機能を使った解錠方法とその実装手順をまとめます。 今回はHomeScreenQuickActionでの解錠について説明します。
3D TouchのHomeScreenQuickActionとは
HomeScreenQuickActionの使い方(解錠方法)
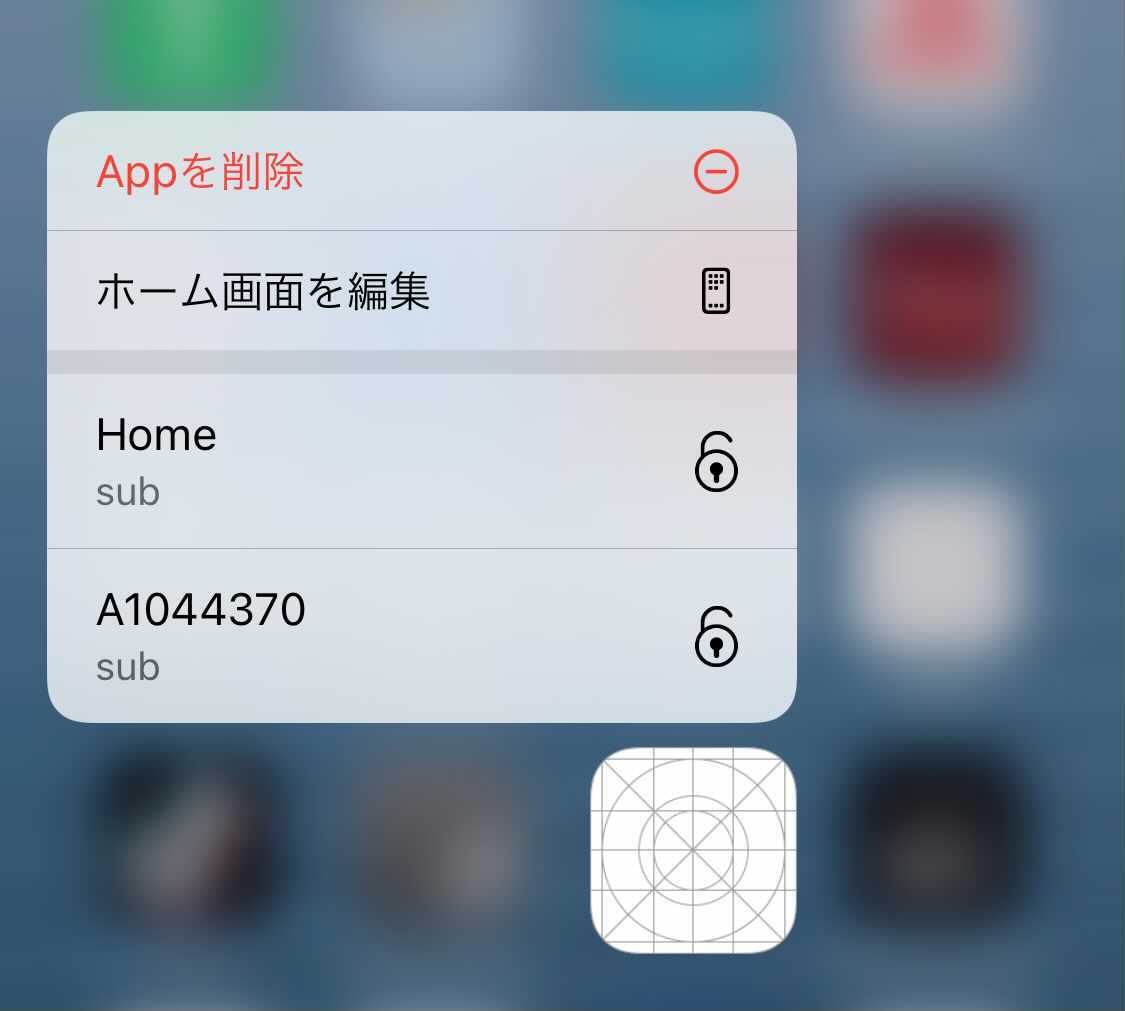
iOS13以降で3D Touch対応端末で、アプリのHomeアイコンを強く押し込んだ時、以下の画面が表示されます。HomeScreenQuickActionに解錠Actionを登録した場合、表示されている鍵/ドア一覧から鍵/ドアをTapすると、アプリが画面が表示され、解錠処理が行われます。
HomeScreenQuickActionの実装方法
HomeScreenQuickActionへのAction登録
静的Actionの登録
アプリのInfo.plistにAction関連ShortcutItemsを追加します。
| Key name | 説明 |
|---|---|
| UIApplicationShortcutItemType (必須) | アクション種別 |
| UIApplicationShortcutItemTitle (必須) | Home Screen 上に表示されるタイトル |
| UIApplicationShortcutItemSubtitle | Home Screen 上に表示されるサブタイトル |
| UIApplicationShortcutItemIconType | アイコンの種別(システム指定アイコン) |
| UIApplicationShortcutItemIconFile | カスタムアイコン |
| UIApplicationShortcutItemUserInfo | 起動時に渡されるデータ |
| UIApplicationShortcutItemIconSymbolName | SF Symbol |
※IconType/IconFile/IconSymbolNameで画像を指定した場合、以下の順で適用される。
- UIApplicationShortcutItemIconSymbolName
- UIApplicationShortcutItemIconFile
- UIApplicationShortcutItemIconType
Info.plist
<key>UIApplicationShortcutItems</key>
<array>
    <dict>
        <key>UIApplicationShortcutItemType</key>
        <string>SearchAction</string>
        <key>UIApplicationShortcutItemIconType</key>
        <string>UIApplicationShortcutIconTypeSearch</string>
        <key>UIApplicationShortcutItemTitle</key>
        <string>Search</string>
        <key>UIApplicationShortcutItemSubtitle</key>
        <string>Search for an item</string>
    </dict>
    <dict>
        <key>UIApplicationShortcutItemType</key>
        <string>ShareAction</string>
        <key>UIApplicationShortcutItemIconType</key>
        <string>UIApplicationShortcutIconTypeShare</string>
        <key>UIApplicationShortcutItemTitle</key>
        <string>Share</string>
        <key>UIApplicationShortcutItemSubtitle</key>
        <string>Share an item</string>
    </dict>
</array>
動的Actionの登録
let icon = UIApplicationShortcutIcon(templateImageName: "shortcut-unlock")
let item = UIMutableApplicationShortcutItem(
    type: key.id,
    localizedTitle: key.name,
    localizedSubtitle: "sub",
    icon: icon,
    userInfo: nil // 必要な情報があればここに追加([String : NSSecureCoding])
)
// 複数のitemを設定できるが、システムが画面サイズに合わせて最適な数を表示(大体最大4個?)
UIApplication.shared.shortcutItems = [item]
Tapした時の処理
Tapした時のイベント処理はUIKit AppとSwiftUI App、そしてSceneを使うかどうかで処理が異なるので、それぞれの処理について説明します。
UIKit Appの場合
- Sceneを使わない場合
func application(_ application: UIApplication, performActionFor shortcutItem: UIApplicationShortcutItem, completionHandler: @escaping (Bool) -> Void) {
    // typeから鍵/ドアのIDを取得し、画面表示、解錠処理を行う
    actionShortcut(shortcutItem.type)
    completionHandler(true)
}
- Sceneを使う場合、且つ、アプリが起動されていない場合
func scene(_ scene: UIScene, willConnectTo session: UISceneSession, options connectionOptions: UIScene.ConnectionOptions) {
    if let shortcutItem = connectionOptions.shortcutItem {
        handleShortcutItem(shortcutItem)
    }
}

func handleShortcutItem(_ shortcutItem: UIApplicationShortcutItem) {
    let id = shortcutItem.type

    // DeepLinks(Universal Links or Custom URL)を使って、関連画面に遷移
    if let url = URL(string: "xxx/" + Id) {
        openURL(url)
        // UIApplication.shared.open(url)
    }
}
通常のDebugの場合、既にアプリが起動されているので、初回起動時のDebugは下記の方法で行います。 Schemeを下記通りに設定し、必要なところにBreakPointを入れます。Runを行い、HomeScreenをTapしてアプリを起動すれば、Debugが可能になります。

- Sceneを使う場合、且つ、アプリが起動されている場合
func windowScene(_ windowScene: UIWindowScene, performActionFor shortcutItem: UIApplicationShortcutItem, completionHandler: @escaping (Bool) -> Void) {
    handleShortcutItem(shortcutItem)
}
SwiftUI Appの場合
デフォルトでAppDelegateとSceneDelegateがないので、カスタムScene Delegateを作成します。 Actionを受信後、openURL()でDeepLinkを送って、対象画面で処理を行います。
@main
struct SmaKeyApp: App {
    @Environment(\.scenePhase) private var scenePhase
    @UIApplicationDelegateAdaptor(AppDelegate.self) var appDelegate

    var body: some Scene {
        WindowGroup {
            ContentView(viewModel: AppViewModel())
        }
    }
}

class AppDelegate: UIResponder, UIApplicationDelegate {
    // MARK: UISceneSession Lifecycle

    func application(_ application: UIApplication, configurationForConnecting connectingSceneSession: UISceneSession, options: UIScene.ConnectionOptions) -> UISceneConfiguration {
        // Info.plistに"Default Configuration"(名前は任意)を設定し、nameに指定した場合、CustomSceneDelegateは不要かも
        let sceneConfiguration = UISceneConfiguration(name: "Custom Configuration", sessionRole: connectingSceneSession.role)
        sceneConfiguration.delegateClass = CustomSceneDelegate.self

        return sceneConfiguration
    }

    func application(_ application: UIApplication, didDiscardSceneSessions sceneSessions: Set<UISceneSession>) {
        // Called when the user discards a scene session.
        // If any sessions were discarded while the application was not running, this will be called shortly after application:didFinishLaunchingWithOptions.
        // Use this method to release any resources that were specific to the discarded scenes, as they will not return.
    }
}

class CustomSceneDelegate: UIResponder, UIWindowSceneDelegate {
    @Environment(\.openURL) var openURL
    func scene(_ scene: UIScene, willConnectTo session: UISceneSession, options connectionOptions: UIScene.ConnectionOptions) {
        if let shortcutItem = connectionOptions.shortcutItem {
            handleShortcutItem(shortcutItem)
        }
    }

    func windowScene(_ windowScene: UIWindowScene, performActionFor shortcutItem: UIApplicationShortcutItem, completionHandler: @escaping (Bool) -> Void) {
        handleShortcutItem(shortcutItem)
        completionHandler(true)
    }
}

extension CustomSceneDelegate {
    // Home Screen Quick Action - Shortcut
    func handleShortcutItem(_ shortcutItem: UIApplicationShortcutItem) {
        let id = shortcutItem.type
        if let url = URL(string: "xxx/" + id) {
            openURL(url)
        }
    }
}
解錠処理の実装
Akerun公開APIで合鍵発行、解錠が可能です。 具体的な実装は割愛します。弊社のAkerun Developersと下記の関連記事をご参照ください。
まとめ
実装方法はいくつかありますが、アプリ種類に合わせれば簡単に実装できます。
次回は、NSUserActivity、SiriShortcutsについて書こうと思います。
株式会社フォトシンスでは、一緒にプロダクトを成長させる様々なレイヤのエンジニアを募集しています。 hrmos.co
Akerun Proの購入はこちらから akerun.com